Our cross curricular resources make connections between art and other subjects, encourage new ways of thinking, and inspire art making. Send us feedback or propose a resource.
Bring lessons from the art studio into the classroom using art from our artists and collection.
You can use this resource in class or at the RA. You can use the whole page or incorporate one or two sections into your existing teaching plans.
This resource draws on current research into creativity in the classroom and supports you to:
Nurture creativity and freedom of expression by looking at how artists investigate the world with curiosity.
Foster resilience and confidence by exploring how artists embrace their ‘mistakes’.
Experiment with the texture, flow and feel of paint and learn and grow from ‘happy accidents’.
Alongside subjects like geography, english, mathematics, and science, art and design underpins all of our resources
• Working scientifically
• Using straightforward scientific evidence to answer questions or support their findings.
• Identifying differences, similarities or changes related to simple scientific ideas and processes.
• Healthy minds, including emotional wellbeing, resilience, mental health
• Playing and exploring
• Active learning
• Thinking critically
An artist’s work can often look like play: exploring, testing, problem-solving, discovering, creating. Play is process rather than outcome. A day in the studio might not end with a specific result—but the process will help the artist get closer to an outcome another day.
‘The production of joyful states creates an optimism in the present and near future, where life is worth living.’ — Brian Sutton-Smith
Increasingly, museums and galleries are incorporating play into their learning programmes, creating a space for artists, children and their families to experiment.
Let’s see how:
• artists use materials inventively
• artworks evolve
• how artists test and trial ideas
• What is this artwork made of?
• How do you think these young artists made the paler marks on this toast?
• How else could you shape or colour bread to make an artwork?
The children who made this artwork have used an unusual material, bringing a playful element to their picture-making. They started with the burnt surface of toast and scratched away to reveal the paler bread. They challenged themselves to use unconventional art tools: teaspoons and wooden knives.
Artists often create marks by removing colour rather than adding it: Scraffito is the art of scratching into the paint layer to make lines. In monoprinting, a printing plate can be inked up and then colour is rubbed away with a rag or tool before printing. What unexpected materials could you choose, to play with these removal techniques?
Discuss what other kinds of food you could use to make art. You might talk about natural dyes or consult our fruit and vegetable how to.
• How many objects are stacked here?
• How would you describe them?
• Have they been arranged in order of size, or weight perhaps?
This sculpture engages with our innate desire to stack objects in a tower, playing with balance and alignment. The artist has taken a simple act of play and developed it into a lengthy production process: these stacked boxes are made of wood and covered in cement panels. The steel top part appears to balance precariously.
What questions do you ask when you’re stacking objects? How high can they go? What happens when they fall? Could you make an artwork that asks these questions?
• Let your eyes wheel around these curved tracks—where do they lead?
• What shapes and colours can you find?
• Focus on the rows of dots. What do you think they’re made of? What do you think this sculpture is made of?
This artist works with sheets of metal and joins them together with hundreds of rivets—a pin that holds together two bits of metal or other material—to make a relief sculpture.
It is a collection of fragments, corners and edges, combined into something new that has never existed before. What do these shapes remind you of? Perhaps a landscape, or a machine, or the body.
How do the painted colours on this sculpture add to the element of play? Do you think the artist had a set of rules, or a plan in mind?
Make abstract reliefs from recycled materials and then paint it in bright colour, using playful intuition.
Explore this collection of RA artworks on the theme of doodling. Artists throughout time have let their minds wander, filling pages with odds and ends of experimental creativity.
During the pandemic lockdowns, the RA invited its Twitter followers to join them in a daily doodle challenge.
Get inspiration from RA doodles and set your class a similar task. Use a word or image prompt to kick-start a 5-minute pause for doodling.
Fearless experimentation involves taking risks and inevitably experiencing failure as well as success. Artists learn to work with these perceived ‘mistakes’, using them to inform their next steps forward.
Research Professor Brené Brown calls this ‘rising skills’: “the ability to get back up when we fall, when we experience setbacks and failures” and sees it as a fundamental aspect of nurturing courage and creativity in the classroom.
What can we learn about making mistakes by looking at and making art?
Use these artworks and activities to:
• accept that materials behave a certain way, often due to natural forces - though we may will them not to!
• find creative ways to accommodate and respond to challenges
• recognise that ‘happy accidents’ can improve our work in surprising ways
• rebound from our unsuccessful first attempts and believe we can do better
• What sort of place are these people sitting in?
• How have they chosen to pose for this portrait?
• Focus on the hands – are these drawn ‘correctly’? Do they look exactly like real hands?
The artist made this painting by looking at a photograph of herself and her daughter. She has used broad brushes and slippery oil paint, enjoying the rhythms of stripes on her jumper and lines around faces and hands.
When we’re drawing or painting people, we might feel the goal is to capture a likeness – to depict every observed detail. When we look at our drawing and compare it to our model, we can experience disappointment that it doesn’t look more similar or accurate. However, this artist is more interested in expression and feeling than observation. She says this painting ‘felt like us’.
• Compare these pots or vases – are they all the same shape?
• Which colour pairing do you enjoy most?
• How do you think the artist made the lines of paint?
This artist has applied modern industrial paint to ancient Chinese urns, mostly from the Han dynasty (206BCE-220CE). This act makes a political statement against the Chinese State. At the same time, his process of letting paint run down the sides of each jar embraces chance and unpredictability: we can’t control the pull of gravity on liquid paint.
This can easily lead to frustrations when we’re working with paint or glue which can seem to run or spread against our will. We might decide the artwork is ‘ruined’. Alternatively, we can choose to welcome the effects of drips and spills as an element of the making. We can’t always control the drip, but we can control our responses to it.
Make a drip painting to help let go of expectations of control. Place multi coloured paint in different jam jars and create a whole class drip and spill painting, allowing each child to choose paint to throw onto a giant piece of paper. Once finished, decide whether the painting or the jars with the spilt paint are the work of art.
• This head is seen from different angles – how can you describe this or show it with your body?
• Do you think the artist moved his pencil quickly or slowly?
• Why do you think he has drawn her several times over?
A pencil drawing is a quick way to test ideas and experiment with different viewpoints. The woman seen here may have been moving, so that the artist needed to make revisions and changes as he drew. Lines overlap and one drawing is made over the top of another: in places there are multiple contours and corrections. The artist leaves it all visible as part of the process, reworking and changing his mind, but not rubbing out.
“The confidence-building resilience of creative learning is supported by having space for ‘safe failure’, critical reflection, and trying again, which are an essential part of the process of growing up.” — The Arts in Schools
For many children and adults, making art brings up a lot of emotions and self-judgement. Our inner critic becomes especially loud!
Use art sessions to build awareness of self-critical thoughts: noticing when we are harsh to ourselves and offering mindfulness approaches of acceptance and kindness.
Allow space for a range of feelings and talk about what comes up at each stage of the activity.
Focus on one medium—the sticky, gloopy substance of paint—to explore how artists have mixed it, brushed it and tested its limits.
Traces of paint have been found on the walls of the earliest dwellings. As young children, we reach out to smear paint with our fingers. For centuries, paint was used to make some of the most iconic artworks in the world. It continues to be at the forefront of artistic practice.
Use this resource to learn about:
Discover primary and secondary colours and how to mix them.
Try different brushstrokes and brushes, textures and effects, and types of paint
• What do you think this person is resting her arm on?
• Follow one of the red brushstrokes: how does it change?
• Where do you see areas that were wet – where one colour has washed into another?
Watercolour is a fluid medium that can be applied in layers or veils of transparent colour. Unlike oil paint, it dries quickly and this artist uses it to make a swift study for a larger painting.
Her design is based on paintings by Angelica Kauffman which are installed in the RA entrance hall ceiling, including Invention. Both artists focus on the active gaze and gesture of the female figure, in contrast to traditional passive representations of women . They both challenge the traditional image of the male artist wielding a paint brush and vigorously applying paint to canvas.
• Scan the painting for the lightest areas – what do you find?
• Do these colours remind you of the natural world?
• How could you make the ridges that criss-cross this picture?
This artist has always had a very experimental approach to paint. In his earlier works he poured the paint directly onto the canvas. In paintings like this one, he experimented with adding strips of Styrofoam to his pictures to create a geometric framework.
The painting is vast: almost 3.5 metres wide and too large to paint at an easel. Laying the canvas onto the floor or pinning them to the wall allowed the artist to move around them in new ways to apply the paint.
Experiment with large scale painting surfaces: wrap a table in paper, or make a collaborative painting in the playground. Try using different tools to apply paint.
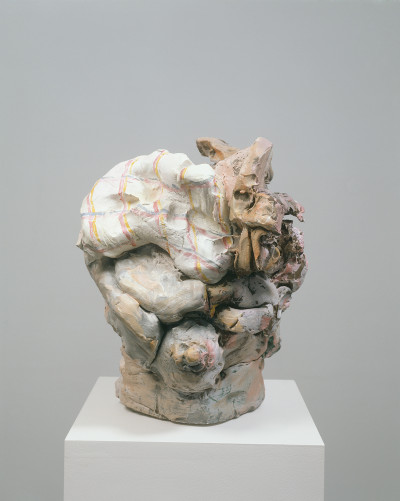
• Which words would you use to describe this sculpture?
• What makes colours change?
• What can you see in this sculpture?
Artists add colour to sculptures in lots of different ways. Artists working with clay usually add colour to their object with ceramic pigments. Unlike working with paints, the heat of the kiln changes the colour. That means, when an artist paints colour onto their sculpture or mug, it often looks completely different after they remove it from the kiln. You can think of what comes out of the kiln is a collaboration between the artist, the pigment, and the heat.
This artists’ sculpture is abstract, so it’s not supposed to look like anything in particular. But, like a cloud in the sky or a patterned wallpaper, you might be able to see lots of different things in it.
This is one of Fiona Rae’s ‘row’ series of paintings, in which she lined up a sequence of abstract shapes and investigated varieties of mark-making.
The artist embraces the playful effects of chance: we can see drips of paint and splashes. Colours are blended directly on the canvas with the brush, creating unpredictable colour mixes. Her paintings have been likened to a musician improvising.
• Describe the splatters of paint here – what words or sounds do they evoke for you?
• Do all the dribbles of paint run down the canvas? How did the artist create drips in the opposite direction?
• Do any of these shapes remind you of letters or numbers?
This painting is painted with a thick impasto—an area of a painting that uses very thick paint or other textured material. The artist has used a range of earth colours on his flax surface.
Basil Beattie’s paintings are abstract but they reference things you might recognise like steps, doors, and tunnels. This painting looks a bit like stairs, but they don’t arrive anywhere.
Take a look at the detail images below as inspiration for your own experiments in paint. You could:
• make a tool by folding card and drag it across the the paint
• push the paint until it forms a giant drip
• repeat a sequence of movements from one side of the page to the other
• add ingredients to your paint to make it thicker, such as cornflour or sand
“Key is a sense of independence; we want them to find something that interests them and then run with it, taking risks. They might start with a theme, such as texture, and end up in an unexpected place in their work. The unexpected is where students begin to show what is inside of them. Seeing that process unfold is so enjoyable and widens one’s understanding of creativity.”
—School teacher Stephanie Cubbin, in What art teachers learn from young students
Joshua Reynolds was renowned for concocting unusual mixtures of wax, oils, eggs and varnish.
On this canvas, he tests over 150 combinations by placing what he called his ‘specimens’ side by side and one on top of the other.
The artist has annotated his experiments with written notes. They remind him what worked and what didn’t, so he could make improvements next time.
• Which areas were painted slowly/quickly?
• Which area was the artist most excited about?
• Do you think the artist was playing or working – why?
• Can you copy the brush strokes with an imaginary paintbrush in the air?
• How would you show this movement with your whole body?
Use these detailed images to talk together about how paint is made, its properties and the gestures we use to move it around.
• How would you move your brush to create white dots – stabbing, prodding, bouncing, or another way?
• Can you make out any written words? What’s the difference between drawing and writing?
• Can you see any patterns? How would you describe them? Reynolds’ mixing experiment has caused the paint to crack. Do you think it’s a success or a failure?
Experiment, abstract, feedback, discuss, draw, and make clay models with these cross curricular classroom activities.
In his artwork Studio Experiments, Reynolds experimented with innovative recipes for paint and varnishes – which weren’t always successful! Use your sketchbook as a laboratory to investigate how materials collide, mix, interact and bubble up.
Here’s one recipe to try:
• mix bicarbonate of soda into liquid paint
• paint freely on your paper: dots, lines and abstract shapes
• apply vinegar over your artwork: splash with a water dropper, drip from a sponge - or invent your own way
• watch and listen as the vinegar (acid) and bicarbonate of soda (base) react to create carbon dioxide – a fizzing colour experiment!
Investigate other STEAM experiments, for example:
• red cabbage water and lemon juice
• cooking oil and water-based paint
What happens when two drawing materials interact? Be inspired by Reynolds to combine dry and wet materials in this layering experiment.
Paper | Possibly a large coin to draw around | Selection of drawing media (pencil, chalk, pen, etc) | Selection of liquid media (oils, cooking ingredients, glues, tea, etc)
Create a mini laboratory on your page by:
• dividing your paper into a grid of 9 (or more) sections – you can do this by ruling lines, folding creases, or drawing around a large coin several times to make a grid of circles
• imagine each section is like a petri dish, ready for the mini experiments to begin
In each section, make marks with a dry material by:
• scribbling with a pencil
• or rubbing with chalk
• experimenting with lines of varying thickness or cross-hatching
Coat your drawing with a layer of transparent or semi-transparent liquid. Try:
• sunflower oil
• pva glue
• black tea
• Test different ways of applying the liquid: dripping, pouring, brushing on
• Which combination of materials would you like to take forward into your artwork another time?
• What changes would you make to the experiments which weren’t so successful?
Be inspired by this account from a teacher on how they learn from their students’ experimentation:
“Last week, a student showed us a drawing which she had covered in sunflower oil at home. The result was magical. The next lesson everyone was testing out sunflower oil as an art material – including me.”
Experiment with the joyful unpredictability of drawing with a sculpture-bot!
Use a motor, electrical current and junk modelling to design and build a drawing machine.
Adjust the construction to disrupt the movements of the bot and increase the erratic variety of its mark-making – opening up greater scope for happy accidents and play.
In this class activity, practise giving praise and feedback on each other’s artwork to encourage growth.
Growth mindset is the belief that we can learn from our setbacks and improve through effort and practice
Research shows that students who receive growth mindset feedback are encouraged to take on greater challenges and increase achievement.
• the process not the outcome
• the action or artwork, not the person
• signs of hard work and effort
• what could get better with practice
• What would you do differently next time?
• What did you learn from that?
• What was challenging? What felt good?
Investigate and discuss together the difference between fixed mindset and growth mindset
Use an RA artwork on the screen to practise constructing growth mindset feedback as a whole class: What feedback could we give this RA artist? What questions would be helpful to them?
To give feedback post-its:
• lay out artworks you have all made in a previous session—display them on uncluttered tables
• give each pupil a limited number of post-it notes and a pencil
• invite pupils to walk around observing the artworks and choosing where to leave their post-it feedback
• set the rules: for example, every artwork must have received at least one post-it by the end of the allocated time
To receive feedback post-its:
• remind each other that receiving feedback is a valuable way to learn and grow
• reflect on the feedback your artwork has received
• make a note of the learnings you take from this
Make your creative ideas visible by modelling a quick sketch in clay.
Many artists capture their first thoughts in a 3-D sketch model. This model was made by a painter, so he could start to visualise what the dragon in his painting might look like from different viewpoints.
When making a model:
• look together at an RA artwork as a source for new ideas
• or experiment with using words as a starter: use prompt cards and encourage students to make a quick fire model inspired by the prompt
• take a lump of clay (or salt dough, or other modelling material)
• make a quick sketch model
To draw your model:
• set it in the middle of the table, an arm’s length away
• make drawings of your model, using free and flowing lines
• use the drawing as a way to edit and change the model: What would you add? What will you take away?
To develop your drawings:
• dim the lights and use a torch or spotlight to create dramatic lighting effects on the model while drawing it
• use photography to record the model and manipulate the image with a digital editing tool
Produced by the Royal Academy’s Learning team in collaboration with Aliki Braine, Karly Allen, Leah Golding and Caroline Marcus Associates.